Thursday, December 12, 2013
Centroids: The Last Part
Using MDSolids I found the centroid of beam cross sections for two Flanged shapes. After making dimensions it computes where the centroid would be.
Wednesday, December 11, 2013
Friday, December 6, 2013
Wednesday, December 4, 2013
Manila Folder Bridge Part I
Quinn, Conner and I worked as a team today for this design build challenge.
Criteria: Build a structure that can support as much weight as possible over a 18" gap.
Constraints Part I:
Materials:
We managed to somehow get 50 magazines on our structure for a brief second before we achieved failure!
Criteria: Build a structure that can support as much weight as possible over a 18" gap.
**Magazines will be the weights and two separated tables will be the gap**
Constraints Part I:
Materials:
- 2 Manila Folders (letter size)
- 2 feet of tape (may not use a piece of tape longer than 6")
Weighing:
- Magazines will be used as "weights"
- Your "score" for our competition is determined by how many magazines your structure supports!
- Magazines will be added to your structure one at a time until "failure" is achieved
- You may place magazines anywhere on your structure as long as:
- All magazines must rest between the two vertical edges of the gap your bridge is spanning (magazines must be over the "gap")
- No magazines may tough the tables (magazines may not be piled up to "self support themselves)
Construction Practices
- Only one end of your design may have a "pinned" connection to the table top (i.e taped). The other end must act as if it were on a "roller" connection (i.e. laying on the table top).
- Manila folders may not be layered more than 3 layers thick at any location.
- Parallel structural members may not touch directly (they can be connected via non parallel connection members (ex. a "ladder" style design))
Our Design:
- Plan 1: fold the manila folders into thirds and place them across the gap connecting them with a few folded strips in the center
- Plan 2: make a design like the bed of nails on Mythbusters- make a lot of little pyramids out of one folder and then tape them all over the other one that is spanned across the gap to try and distribute the weight of the magazines
- Plan 3: use the manila folders and fold them into thirds and create a triangular prism place them side by side separated by two inches across the gap
- Final plan: make the folders into triangular prisms and put one inside the other across the gap
We managed to somehow get 50 magazines on our structure for a brief second before we achieved failure!
Monday, December 2, 2013
Centroids Part II
We finished part II of the centroids packet today with our table groups. Corin, Conner, Conner, Quinn, and Mark were in my group.
The first part was to make a complex shape out of a manila folder or some foam board
 |
| Sadly part of our shape was cut out of the picture |
Then using a thumb tack, sheet of foam board and plumb bob made out of string and a roll of tap
 |
| The process of drawing lines where the string hung in front of our shape |
We finished drawing lines from all of the corners using the plumb bob
 |
| This is the first side we tried |
Turned out our approximated centroid location was off so we tried again
 |
| We redid the lines on the other side |
This time we made a little bigger holes to allow more free movement
 |
| Our new approximated location for the centroid was much more accurate |
Using a finger on the centroid we could balance the foam board shape
Sunday, December 1, 2013
Beam Deflection
My team members were Corin, Conner, Conner, Quinn, and Mark. Using a 2x4, a few phone books and magazines, and a measuring tape we would use beam deflection to try to calculate the weight of a group member.
Mark was our first attempt
Conner L. was our second attempt
It was pretty cool to see how close we could get to the actual weight of the person.
Mark was our first attempt
Conner L. was our second attempt
It was pretty cool to see how close we could get to the actual weight of the person.
Friday, November 8, 2013
Mousetrap Racecar
The first part was challenge to complete was picking a good partner, and that was easy to do.
Quinn and I got the parts to build our car right away and started to brainstorm.
Criteria:
- Design, build and compete with a Mousetrap Racecar (at least 2 axles).
- Maintain a clean workspace
Constraints:
- One mousetrap
- No more than 12 inches of masking tape
- Fischertechnique robotics parts
- No more than 24 inches of string
- All materials must travel with your vehicle
- Work through the stages of the event
- Additional materials by Instructor approval
Achievement #1
"Brainiac"- brainstorm 10 ideas for your design
- Dune buggy style- long axles with wheels far away from the body
- Really fat tires
- Wheels wide set in the back and close in the front
- Wheels wide set in the front and close in the back
- Use string to secure the axles to the mousetrap
- Use tape to attach axle on bottom of the trap
- Use a third set of wheel to propel the car
- Use the plastic treads to keep the wheels straight
- Connect all of the axles together like the wheels of a train
- Set off the trap by pulling a piece of string
Achievement #2
"Visualize it!"- Create a sketch of design and label key parts
Achievement #3
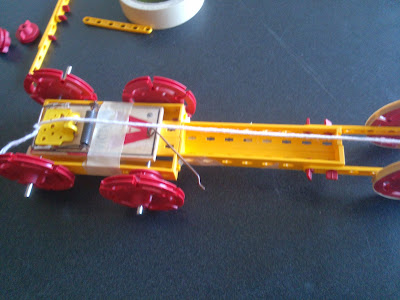
"Build it!"- Build your design and document it with a photo
The evolution of our mousetrap racecar
Achievement #4
"The Price of Glory"- If each part you use costs $1, evaluate the total cost of your build
- 6 wheels: $6
- 8 yellow building pieces: $8
- 7 red attachment parts: $7
- 2 axles: $2
- 1 piece of string: $1
- 1 piece of tape: $1
- 1 mousetrap: $1
Total Cost: $26
Achievement #5
"Competitor"- compete in the 2nd Annual Mousetrap Racecar Challenge
Achievement #6
"Long Distance Winner!"- Travel the furthest in the distance race
Achievement #7
"Feedback"- Collect feedback
- + We won without adding extended length like
Achievement #8
"Re-work"- Change your build based on the experience with the race/feedback you collected. Document it
-Originally we had rubber bands on the 2 front wheels and the back 4 wheels
Race 1: (original build) We went 7 tiles and place 2nd to last
-We removed the rubber bands off the 2 outer rear wheels
Race 2: (Change 1) We only went 5 tiles
-We put the rubber bands back on the outer 2 rear wheels and removed the middle wheels and axle
Race 3: (Change 2) We went 10 tiles passing our furthest distance
-The string would unwind completely and then would rewind on the axle causing the car to go backwards. We extended the length of the string a few inches
Race 4: (Change 3) We went 20 tiles and moved into 1st place
-The extra length of the string helped a lot, so we decided to make it a little longer
Race 5: (Change 4) The extra string ended up just getting tangled around the axle and gave us a worse result
Achievement #9
Achievement #9
"Game Changer"- Develop a new rule or change to the game that you feel would make the event even better. Explain.
Creative Mode Challenge: Following the acceleration and distance events should be the creative mode challenge
- Each team during a set amount of time (10 minutes or so) can make a really creative change to their cars.
- With almost no limitations on what they want to add to it (no motors/battery powered additions)
- After the new addition have another distance race to see whose car can go the farthest
Achievement #10
"Name it"- Invent a name for an achievement that you think is better than one we currently have.
Change "Brainiac" to "Lightbulb Master": originating from Gru in Despicable Me whenever he comes up with a new idea
Achievement #11
"Leave it Cleaner Than You Found it!"- Did you leave your work space cleaner than you found it? Explain.
We left our work space cleaner than we found it by putting aside working on creating a blog post during class time to help sweep the floor and put away all the pieces of robotics kits covering the tables.
Achievement #12
"Design/Build"- What is a "Design/Build" process? How did your experience with this challenge relate to that? Why might you experience this in a career related to technical innovation?
The process is: define goals/needs of your build, brainstorm, prototype 1: labeled sketch/drawing, collaborate ideas for change, prototype 2: build the sketch, test it, feedback, change, and test again (keep changing and testing until satisfied). For this challenge we built our initial design and tried to just add things to that original idea, until the last minute when we couldn't get it to work. We decided to start from scratch and finally we got our car to move. During the races we changed our build a little bit each time until we were satisfied. When it comes to technical innovation, you won't know how to change things until you test them to see the flaws. You can't test them unless you design and build them, so if you want to be successful in the field than you will definitely run into some design/build processes.
Sunday, November 3, 2013
Creating Our Own Pulley System
Our task was to work in a group and create a pulley system with a fixed and movable pulley.
We used a spring scale to measure the amount of force it took to lift the movable pulley and the weight we attached to it. It took .95 Newtons of force to lift it. Then using the pulley system we used the spring scale again to measure the amount of force needed to lift the movable pulley and weight. It took only .4 Newtons to lift the weight. The mechanical advantage is 2:1.
Activity 1.1.2 Simple Machines Practice Problems
We got to take a look at a few different real life problems using simple machines.
Simple Machines: Lever
EX 1:
A first class lever, in static equilibrium, has a 50 lb resistance forces and 15 lb effort force. The lever's effort force is located 4 ft from the fulcrum.
1. Sketch and annotate lever system described above
2. Calculate:
Actual Mechanical Advantage (AMA)
AMA= Force Resistance/Force Effort
AMA= 50 lbs/15 lbs
AMA= 3.33
3. Static Equilibrium Calculations:
DR= Distance of Resistance Force
M= moment (Force x distance)
Moment Effort + Moment Resistance
-->
∑
-->MFulcrum= 0
(15 lbs)(4 ft) + (50 lbs)(DR)= 0
50 lbs(DR) = 60 lbs/ft
DR= 1.2 ft
EX 2:
A wheel barrow is used to lift a 200 lb load. The length from the wheel axle to the center of the load is 2 ft. The length from the wheel and axle to the effort is 5 ft.
1. Illustrate and annotate lever system described above
A wheel barrow is used to lift a 200 lb load. The length from the wheel axle to the center of the load is 2 ft. The length from the wheel and axle to the effort is 5 ft.
1. Illustrate and annotate lever system described above
2. Calculate:
Ideal Mechanical Advantage (IMA)
IMA= Distance(effort force)/Distance(resistant force)
IMA= 5 feet/ 2 feet
IMA= 2.5
3. Static Equilibrium Calculations:
FE= Force of Effort Force
M= moment (Force x distance)
Moment Effort + Moment Resistance
EX 3:
IMA= Distance(effort force)/Distance(resistant force)
IMA= 5 feet/ 2 feet
IMA= 2.5
3. Static Equilibrium Calculations:
FE= Force of Effort Force
M= moment (Force x distance)
Moment Effort + Moment Resistance
∑
MFulcrum= 0
(200lbs)(2ft) + (5ft)(FE)= 0
5ft (FE) = 400 lbs/ft
FE= 80 lbs
EX 3:
A medical technician uses a pair of 4 inch long tweezers to remove a wood sliver from a patient. The technician is applying 1 lb of squeezing force to the tweezers. If more than 1/5 lb of force is applied to the sliver, it will break and become difficult to remove.
1. Sketch and annotate lever system described above
2. Calculate:
Actual Mechanical Advantage (AMA)
AMA= Force Resistance/Force Effort
AMA= 1 lb/ (1/5) lb
AMA= 0.2
3. Static Equilibrium Calculations:
DR= Distance of Effort Force
M= moment (Force x distance)
Moment Effort + Moment Resistance
∑
MFulcrum= 0
(4 in)(1/5 lb) + (1 lb)(DE)= 0
1 lb(DE) = (4/5) lb/in
DE= 0.8 in
Simple Machines: Pulley
EX 1:
A construction crew lifts approximately 560 lb of material several times during a day from a flatbed truck to a 32 ft rooftop. A block and tackle system with 50 lb of effort force is designed to lift the materials.
1. Calculate:
AMA= Force Resistance/Force Effort
AMA= 560 lb/50 lb
AMA= 11.2
2. How many supporting strands will be needed in the pulley system?
2 x(# of moveable pulleys) + 1(if changing direction)= # of strands
(2 x 4) +1= 9 strands
Friday, November 1, 2013
Guess the Weight of the Jug of Water
Using a 2x4 piece of wood we set up a 1st class lever (like a seesaw) and we were given the demonstration with a 5 lb weight and a 20 lb weight. Mr. Olson showed us how to calculate the unknown distance or weight of a force .
Using the equation:
(mass of object 1)x(distance from fulcrum) + (mass of object 2)x(distance from fulcrum)= 0
Then you solve for the unknown. In this case we had a 5 lb weight and a jug of water with an unknown weight. Our group centered the wood and placed the 5 lb weight 46 inches away from the fulcrum. Moving the jug of water closer and further from the fulcrum we balanced the force of the weights on both sides. The unknown weight was measured to be 26 inches away from the fulcrum.
Solving for the unknown:
(5lb)x(46in) + (?lb)x(26in)= 0
230= (?lb)x(26in)
(230/26)= (?lb)
?= 8.85 lbs
After all the groups finished making their guesses we wrote our estimated weights on the white board. Mr. Olson's guess was taking the average of all the group scores which gave us almost the exact weight of 8.7 lbs.
Then we calculated percent error:
[(approximate-exact)/exact] x 100= % error
[(8.85-8.7)/8.7]x 100=?
[.15/8.7]x 100= 1.7% error
Friday, October 18, 2013
Marble-Drop Madness
Design Build Challenge #2
Release a marble onto a freestanding contraption of our own design located at the edge of our desk.
Materials
Goal:
Rules:
Results:
Release a marble onto a freestanding contraption of our own design located at the edge of our desk.
Materials
- 14 straws
- 10 toothpicks
- 3 paper cups
- 3 feet of masking tape
- 1 round marble
Goal:
- Build a "structure" starting at the edge of the desk
- Use "structure" to make a marble to end up in a cup on the floor
- Make the structure go as far as possible from the desk (used to determine score)
Rules:
- Limited to given materials
- Marble must end up in a cup positioned on the floor
Results:
- Team Team created a structure that went 4 and 2/3 tiles
- The marble made it into the cup and stayed in
- We scored 1 point after ranking 1st place against other groups
Our design:
- Placed two straws next to each other and tape them together on only one side
- Tape the seven pairs together again only on one side
- To make a more stable track for the marble we place a toothpick in between the straws at each place the seven pair were connected
- Tape the three cups together bottom to bottom and then top to top
- Cut the bottom out of the first two cups
- Stick the 3 remaining toothpicks in the side of the first cup forming a tripod
- Lastly tape the straws underneath the edge of the table and the cups to the floor
Clean-up Time!
Wednesday, September 18, 2013
4th Annual Cardboard Canoe Challenge
Back again for round 2, last year my groups boat didn't turn out as good as we imagined, so this is my chance to have success.
The Spicey Llamas are claiming 17 credits
The Cardboard Canoe Challenge tests how you well you can work with a team mostly. There are other factors involved like brainstorming, prototyping, designing, and learning from our small failures. Taking a bunch of cardboard and three large rolls of duct tape we had to create a boat to hold one member across the pool. After we went across the pool there was a series of challenges to complete achievements that were available to earn.
Design Achievements
The Pac Man Game: We didn't do all that spectacular in this challenge but we did get a few boards (2 blue and 1 yellow) and the video
The Spicey Llamas are claiming 17 credits
The Cardboard Canoe Challenge tests how you well you can work with a team mostly. There are other factors involved like brainstorming, prototyping, designing, and learning from our small failures. Taking a bunch of cardboard and three large rolls of duct tape we had to create a boat to hold one member across the pool. After we went across the pool there was a series of challenges to complete achievements that were available to earn.
Design Achievements
1st Achievement
Define Problem- Create a boat that will carry at least one group member across the pool
Brainstorm Solutions
- rectangle box
- rocket ship
- like the things on the water log rides
- boat with a rudder
- a box with a paddle
- have a keel
- wings on the side
- pointed bow
- sea kayak
- submarine
- v-bottom boat
- floating bowl
- box in a box
- mini sailboat
- paddle board with sides
- jet ski
- motor boat
- floating bed
- boat designed to look like a shark
- boat with side support
2nd Achievement
Criteria- Build a boat that will get you across the school pool
- One person will have to be in the boat while it crosses the pool
- No time for trashing the pool
Constraints
- The only materials to be used are Duct tape and cardboard
- The wall of the boats must be 3 inches or taller
- The entire surface needs to be completely covered in Duct tape
- Limited amount of cardboard and Duct tape
3rd Achievement
Sketch Ideas |
| 1. Flat bottom for stability 2. Tall sides to assure that no water will come over the sides 3. Pointed bow to cut through the water |
 |
| 1. Pointed bow for aerodynamics 2. Covered on top to prevent water from splashing in 3. Multiple layers of cardboard on the bottom for durability |
 |
| 1. Side support for stability 2. High wall to keep water out 3. A paddle to move the boat |
4th Achievement
Prototype
5th Achievement
Select an Approach
6th Achievement
Surface Area
60 yards x 1.88 inches x 3 rolls
180 feet x 0.15667 feet x 3 rolls
28 feet squared x 3 rolls
84 feet squared
Efficiency: about 88%
Build Achievements
7th Achievement
Build It!
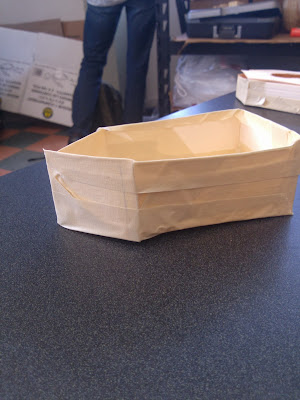
We met the standards of construction (100% of our boat was covered in duct tape and there were no foreign objects in the cardboard).
Test Achievements
The Fastest
10th Achievement
The Longest
8th Achievement
The Fastest
The Spicey Llamas are speedy water llamas. Technically we came in second, but the other team used string to help them so we are able to claim this achievement.
9th Achievement
The Farthest
Not only are we fast, but we are strong and can go on for many laps with no problems.
10th Achievement
Our canoe stayed afloat the entire time we were in the pool and could stay afloat for a lot more time. At the end of the period our boat was completely intact.
11th Achievement
Balance Master
The Spicey Llamas can balance for more than 5 seconds.
12th Achievement
Videographer
We took a video of all the challenges we did at the pool.
Reflection Achievements
13th Achievement
Feedback- + thickness of the bottom helped durability
- Change: add a pointed bow
- ? How much more weight could our boat have held if the weight was distributed evenly and had more space?
- ! We got almost every achievement you could get!
14th Achievement
How low did you go?
Our canoe didn't sit very low at all in the water. It was surprising how little it went under water. The weight of water in pounds is 62.43 lbs/ft cubed. The pilot weighed roughly 140 pounds. The boat only sat about an inch in the water with only one person in it.
15th Achievement
16th Achievement
15th Achievement
Redesign
If I were to do the project again I wouldn't change much at all because it worked so well. If we had enough time I would want to try to make a pointed bow
16th Achievement
Make Your Own Achievement
- The tank: Make a boat that can stay afloat with 500 pounds inside the boat- We had 535 pounds in the boat at one time and if the weight was distributed equally we could have put even more in!
- The Middle Passage: Fit two people inside the boat while it stays afloat- We fit 3 people into our canoe! (We are trying to earn the 17th Achievement with this new record we set)
The Pac Man Game: We didn't do all that spectacular in this challenge but we did get a few boards (2 blue and 1 yellow) and the video
Subscribe to:
Comments (Atom)


.jpg)


